Showing posts with label Handmade Holidays. Show all posts

Tuesday, September 4, 2012

Fall Frenzy Craft Project

This project is so easy, it will knock your socks off.

If you are a fan of QOTC on FB, then you may have seen this picture from earlier this morning:


I found these cute socks at Walgreens last night - they were 2/$6. I picked them up because I saw this on Pinterest. I thought it was super adorable and clever. But, I am not ready for winter just yet (it's still 105+ here, people). So I decided to make a gift my son's Kindergarten teacher, now that school is in full swing, and she's acclimated. Perhaps it's an "I'm Sorry!" gift. :)

I opted for the more current fall pumpkin theme.


I literally did my pumpkin in less than 15 minutes, while multi-tasking (listening in on a conference call). Remember, my office & craft room share a space.

I got all my supplies out...and made sure I had what I needed (or worked with what I had).

1) Scissors
2) Socks
3) Needle & Thread
4) Rice
5) Silly Eyes and miniature wooden dowels
6) Glitter Sticky Sheets
7) Wraphia (the brown paper string)
8) Hot glue gun
9) T-Pin or Pushpin


First, I cut off the ends of the socks. The top of one and then the bottom and top of the second one.


Then I used my brown rice to fill the plain sock.


Once I filled the sock up - I moved the rice around a little into the shape of a "pumpkin."


I then proceeded to add a little more rice to the second part of the sock (from where I sewed it shut) to create a stem. Using leftover sock (from the argyle one), I made a little hat. I hot glued the googly eyes on, used a small wooden dowel (dipped in orange paint) for the nose.

To ensure there was no guessing that lil' dude IS IN FACT a pumpkin, I cut out two leaves using the self-adhesive glitter paper and used a t-pin to secure it (to help the sticky stuff stay).

Finally, I wrapped wraphia around his neck and made a bow. That's it. Super easy and super cute. The teacher can use it as a decoration or even as a paper weight on her desk!


I highly recommend you checking out Then She Made... it's a cute blog and there you will find the instructions on how to make the snowmen. You know, for when it's colder out.

Anyone else feel like they have to bribe their students' teachers?!

Thursday, December 22, 2011

I'm a Freak: V-Day Already?!

I swear, I am worse than Hobby Lobby or Wal-Mart.
I don't think even they have Valentine's on their mind yet (although, I did see some Spring at the Hob Lob this week!)...

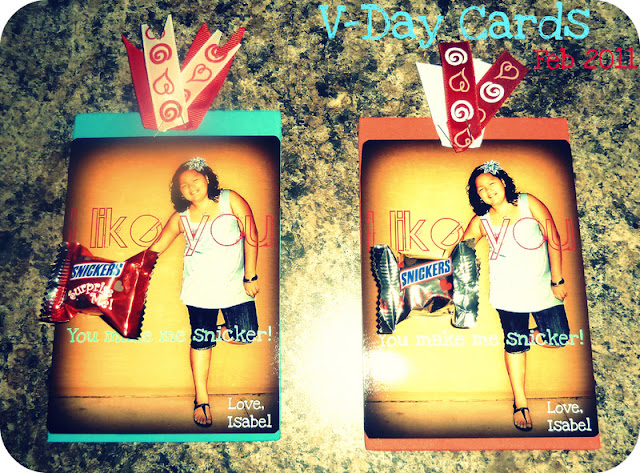
I am really wanting to be super organized this coming year... so I thought while I had some down time, I would get started on Isabel's V-Day cards. Her being almost 13 and all, we had to mature her cards up a little.

Here are Isabel's cards from last year... which was our first time ever making handmade cards.


And this is what we have as our first draft for this coming V-Day:


This may not what we end up with, but it sure has our creative juices flowing. Isa mentioned that she'd like to do a little gift for her close friends at school, so I am going to have to see what else I can come up with.

Off to check out Pinterest to see if I can find some additional ideas.

Happy Valentine's Day Holidays!

Wednesday, December 14, 2011

Fun Christmas Art

Inspired by Landee (of Landee See, Landee Do), I've decided to create some fun Christmas art.
And these babies are large.  20x30 to be exact.

With our Christmas party this Saturday, I am sending them over to Costco to get printed out and then I will add them to frames to hang up, just in time for our guests to marvel and ooh and aah!

Or, they can use them as a guide for when we pull out the Karaoke machine. =)

You will see I went for a different type of Christmas songs... considering our theme for our Christmas party. Very casual, over the top... totally fun.  If you prefer more traditional songs, then visit Landee - she has them available to download as well!


For my first time using PhotoShop for something like this, I think they turned out too cute.
If you agree, feel free to print them out and hang them around your house!

You can borrow the ones above... or, you can download the larger sized ones here.

Don't you just ♥ the holidays?!

Tuesday, December 13, 2011

Our Christmas Card {2011}

With the last of our Christmas Cards finally in the mail...I can now share with you here. 

I've made (aka taken a picture and had it printed off at Costco) our Christmas Cards for the past couple of years. The difference this year is that I put a little more thought into it.

I think it came out wonderfully; however, I wish I would have thought about the printing portion of making the cards a little more.  I would have loved to have had it printed on card stock, rather than photo paper.

Eh, there's always next year.

But until then, here's what we have:


I insisted that our 16 year old niece, Abby, (who came to live with us back in October) be a part of the card. After a few hours of prodding, she finally gave in! ;) Love that girl.

That picture of Nic is so....... Nic. Had to include it! ;)

So, there you have it... our 2011 Christmas Card.

Speaking of Christmas Cards... I found one I thought was pretty darn adorable in blog land this week...


Michelle, of Michelle Paige, did a cute job of putting her cards together... in the CAR!
Here's a sneak peak, but please visit Michelle to see how she made it all possible.


Wednesday, December 7, 2011

Red is my friend, right? {4 & 5/12 Christmas Crafts}

Last Christmas, I avoided red. Like the plague.
I had golds and bronzes and burnt oranges... but no reds.

Then I got bit by the red bug {which may or may not be related to the bed bug} - and now I am in lurve.
 
See for yourself.


Eeks. I don't know what happened. And I guess it would be red and white and black, really. Let me share with you what I do know.


1) My zebra lampshade that normally sits in my very green office. Repurpose (Free!)
2) Framed Art. Yeah right. Try dollar store frames with dollar store gift bags. I just cut out the cuteness and added it to the frame. Easy peasy. $4 total (for the trees and the penguin)
3) Candle stick was a Goodwill find, bought it for Halloween. Repurpose (Free!)
4) More Styrofoam and pipe cleaner trees. All on hand. (Free!)
5) Berry branches - $1 each at Hobby Lobby $3
6) A red pot from years and years ago, turned upside down lengthen the lamp. Repurposed (Free!)
7) Glass jar from the dollar store filled with red Styrofoam berries from the dollar store. The twigs I got from Hobby Lobby. $4 total.
8) Walgreens trees $1 in a candle I already had.


  With so much going on, I am going to count this as Craft #'s 4 and 5. I am the Queen, after all.


Well, what do you think?! I know I am going to have a lot going on in the house, but I can't help it. I am having so much fun!!

Off to see where else I can add some red.

Tuesday, December 6, 2011

Super Simple Snowmen {3/12 Christmas Crafts}

I am starting to realize that I am slightly OCD.
I start working on one space - and can't leave it alone.


Take for example my mini*mantel that I shared with you a few days ago... Well, I've added a few good men to it. Snowmen, that is! =)


These guys were super simple and *CHEAP* {please don't tell them I called them that!}

I got the Styrofoam balls from dollar store - they came in different sizes 6 to a pack.
I bought the pipe cleaners from Hobby Lobby $0.87 each package. And I had the straight pins, thumb tacks and Sharpie.


I am so glad Isabel wanted to help out! We don't get to do crafts together that often. I ♥ her.

Besides the snowmen, I also made several more trees. I loved using the pipe cleaners {the more I type that, the more I wonder if that's their official craft name. lol}  Here are my bald snowmen next to some cool trees.


And... here is my mini*mantel space and the radio cabinet beneath it.
I've added the poinsettias, a vase filled with cranberry foam balls, the trees and snowmen, a lovely green candy dish (Goodwill $1 several months ago!) and a frame with a bow.

I realize it may be a bit much - all of it. So I have since moved the frame. But now that I look at the picture below, I am kinda digging it there.


So there we have our third craft (and a small repeat of craft #2)...


I am truly digging this holiday season!


Make it Yours @ My Backyard Eden

Monday, December 5, 2011

Beads + Pipes = Trees {2/12 Christmas Crafts}

Since I am behind, I thought I might as well make an effort to catch up.
So, two posts in one day, you get. Yipee.


Here is the second of twelve crafts I am sharing with you this month... Christmas Trees for my other non-mantel.


How did I make them, you say?!

Well, they were pretty darn easy.

I used two different sized cones, some hot glue, Mardi Gras beads in the colors of my Christmas decor, and then also white pipe cleaners.


Then, I must apologize for the picture quality. I *still* cannot find my camera's battery charger. So I am using an old camera. SMH

I wrapped and hot glued the beaded tree, but for the pipe cleaner tree, I simply stuck the wire in, wrapped, and stuck the other end in. It was super easy. I did add some straight pins to bring some color to the tree; however, I am not sure how much I love them. I don't have a lot of red in the house, so I'd hate to add it there. We will see. ;)  But for now, I at least have gotten a head start on my non-mantel.


P.S. The third {middle} tree is from Walgreen's... $1.00.  Everything else I had on hand, so rank this under cheap! =)

Linking to:

Sunday, December 4, 2011

Mini*Mantel {1/12 Christmas Crafts}


Four days in and I am already behind... but what do you expect during the holiday season, really?
I need to get my Christmas cards out... I want to get some holiday baking done... and I want to complete my goal of twelve crafts for Christmas.

This morning, we packed up all of Nic's birthday decorations and cracked open the Christmas totes. I've put up garland and hung our stockings {with care}...

And I got one crafty thing done... My mini mantel.
As a reminder, here is what it looked like for Thanksgiving...


And here it is as of right.... NOW! ;)


This shelf hangs above my smaller radio cabinet, in the formal dining room. I had different plans for the "O" in JOY, but a certain now 5 year old decided that he wanted to crack those plans open. Literally. So, I used what I had on hand (which is not much since I haven't been to Hobby Lobby in over 5 days).  I used the bottom ring of a $1.00 light shade from Target. I had already taken the actual shade off of the rings, because I needed to use the top piece for a lamp (long story, but it involves an older style lamp shade and zip ties. Kinky. Okay, maybe not).

I wrapped the ring with ribbon. And I am in the middle of looking for two bronze-ish bells I found at the dollar store to tie at the top, where the "bow" is.

The owl I had from Thanksgiving, the star was bought for Nic's birthday, the cinnamon sticks in the mason jar, I had, the candle I had, the tinsel I had, and the little tree was $1 from Walgreens.  The J and the Y were $.99 from Hobby Lobby, and finally, the green spray paint I had from a different project.  So, less than $3 for this mini*mantel makeover.


Could I get anything else on that shelf? Really?!

Maybe not, but the bottom would be a great place to hang Christmas cards from {hint, hint!}...

So, we are still decking the halls over in my hood, but I will be sure to post pictures from Nic's party super soon and then of course, the other 11 crafts (that I have yet to do!)...

Happy Sunday!


Monday, November 28, 2011

If I didn't think Bank of America would miss me too much...

I'd quit my job and become a wreath maker.

Seriously.

{unless someone from BofA is reading this, then please know that I *love* my job and I wouldn't abandon it for all of the tea in China}


I was a focused wreath maker yesterday.
I started Nic's birthday wreath and made two Christmas wreaths for outside... and worked on our front door Christmas wreath.

Nic's {going to be Cowboy themed} Birthday wreath:


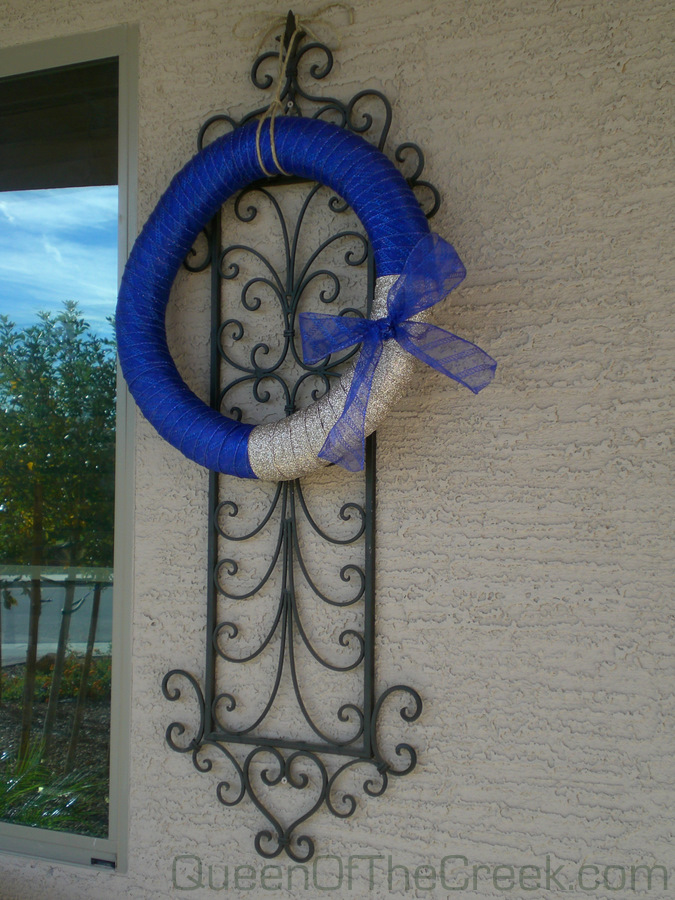
Here are our outside wreaths:


You can see I put up my iron decor again! I figured if asked, I would tell them that it's part of my Christmas decorations! lol... they will come down when the rest of the decorations come down!

P.S. The green pillows will be swapped out for more festive ones. :)

Here is the one for the front door:


I thought it was done, but I am wondering if it's too plain?
I wanted it to match, but not match the other two. There is going to be a lot going on when the lights and other decor are introduced, so we will see if I end up adding to it later on.

I used a flat wood wreath for this one. Got it at Michael's (and probably spent way too much. i ♥ hobby lobby).


As usual, for the first three, I used the plastic covered straw wreaths from Hobby Lobby ($4.99) and some pretty ribbon. For the Christmas ones, I used blue and gold. We are incorporating the blue into our color scheme this year. All of our outside lights are blue!

I think I am getting pretty good at making bows!!

Anyway - that's the only thing I've worked on for Christmas so far. I need to get past Nic's birthday party this Saturday and then I will drag the rest of the Christmas decor out and get all jolly-like.

So exciting.

Maybe I can make more wreaths for the inside of the house?!
Become the weird wreath lady of the neighborhood?!
It's a thought.